
So what is it anyway? Lightroom was developed by Adobe with a team of actual photographers as a one-stop-shop for handling digital images, from initial upload right through to the final output. It’s designed by photographers, for photographers, and it works brilliantly.
Lightroom handles files very quickly and efficiently by using previews of the photos. This is known as non-destructive editing.
i.e. any changes made in Lightroom are done to the preview, not the original image. Once your corrections and edits are made, you must then export the file, turning the adjusted/edited preview into an actual file. You can choose to overwrite your existing files (source file) or create brand new ones (which is what I do). You can export in a variety of different file formats. I create Jpegs for clients and RAWs for archiving.
Lightroom is essentially designed to manage RAW images and does this very well.
A RAW image is simply a photo that includes all the raw data captured by your image sensor, without the camera changing it in any way. Lightroom allows you to manipulate this RAW data to produce a final image, usually a JPEG. If you let your camera produce the JPEG for you, it leaves much less latitude for editing later on. Many settings of a JPEG get “baked into” the file by your camera, and can’t be changed. With RAW you can change virtually every parameter of the image. A great example of this is white balance. If baked into a Jpeg, it’s very difficult to change later. In a RAW image, however, it’s as easy as moving a simple editing slider. Your camera has a fairly limited ‘brain’ compared to your big desktop computer. In-camera Jpegs will generally be inferior to those you create yourself from a RAW file. Technical aspects aside, Lightroom is your digital darkroom and a place where you can craft photos with your own feel and flavour – your personal style. This is the fun part and having an efficient and repeatable lightroom workflow plays a big part in making this happen.
I’ve been using Lightroom since it was first released and it fundamentally changed how I work.
Beforehand, I used Adobe Bridge and Photoshop. Now I spend most of my time in Lightroom, way less in Photoshop and I haven’t used Bridge for years.
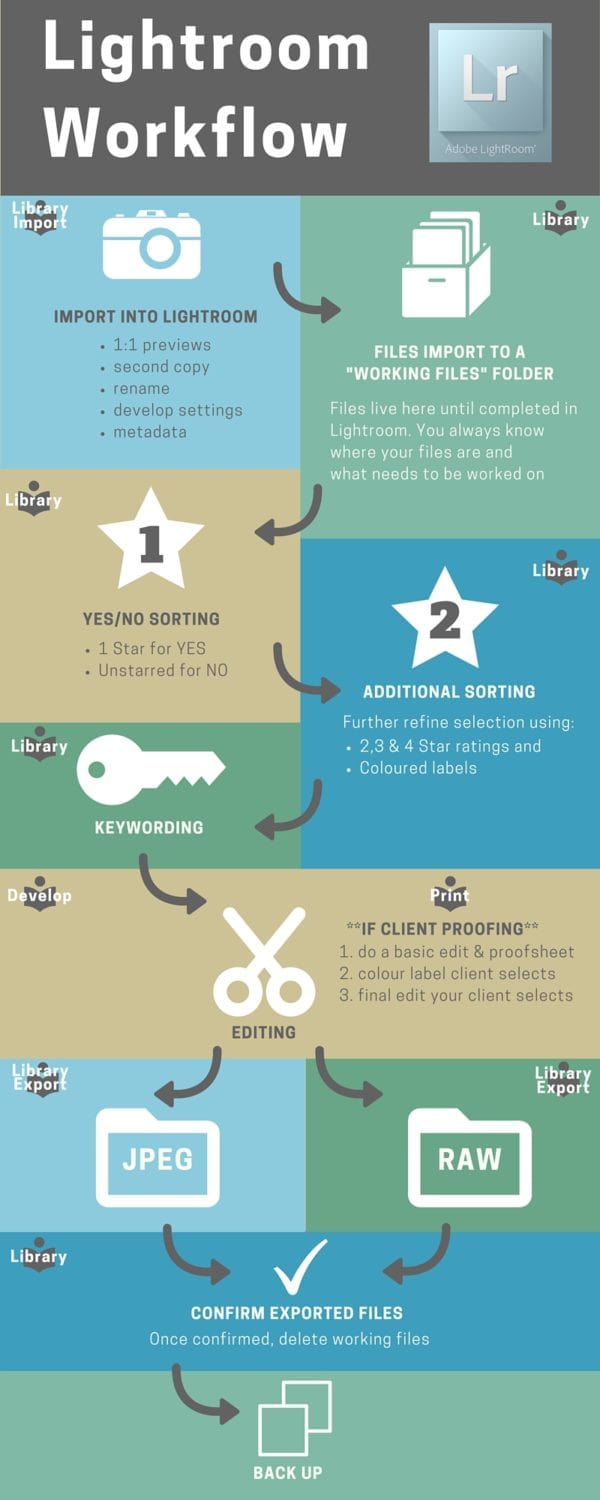
Note that I use Lightroom solely as an image processing engine. I do not use it for cataloguing or filing images, although it can be used for this. This lightroom workflow is centered around handling and processing raw images.
So in a nutshell, here’s what I do in Lightroom:
upload, backup, rename, add metadata, sort/select/rate, keyword, edit, proof, and output.
Completed images are exported to their final resting place on my server. This is where they will live forevermore. I then backup both onsite and offsite and finally delete the original files from my Working Files folder. See part 2 of this blog which explores my workflow in greater detail.
Lightroom has different sections called Modules, which are used for different purposes within the program.
I only use 3 of these for all my professional and personal work: Library, Develop and Print. Others I’m sure use lightroom differently, but this is how I do it:
Library = import, view, sort, rate, select, keyword and export
Develop = to edit or process images.
Print = to create proofsheets
Now let’s have a look at each of these modules. Rather than talk about them, check out these videos on each of the modules:
Library Module Overview :
Develop Module Overview:
Print Module Overview:
Lightroom’s secret weapon is the ability to save presets and does bulk operations, which greatly speeds up the sorting and editing process.
The ultimate goal is to have an efficient and effective lightroom workflow, which delivers consistently awesome images. I couldn’t imagine my photographic life without it. Please feel free to comment below and I check out part 2 of this blog which goes into more detail about some of my processes.
Great introduction to Lightroom. I’m waiting patently part2 ? Bye. Claudio. Italy.
Hey Claudio, thanks for checking it out. part 02 will be coming shortly
Good afternoon. Thanks.Love your blog!.
Thanks for checking it out – cheers Dean