In this post I’m going to stick to the basics and outline 5 reasons why you’re getting blurry photos.
You can then implement the necessary steps to avoid this from happening in your own images.
Achieving image sharpness is a very broad topic covering principles from very basic camera movement, to the more advanced ones of perceived sharpness and complex lens design factors. For example, see this video on the topic of the circle of confusion.
I use the wonderful Adobe Lightroom to process my images, and it’s here that I critically assess the sharpness of my images. See this quick video on how to do this. This is a fundamental step I take when selecting images from a shoot, and you would do well to incorporate it into your workflow too. Use this step to determine if photos are blurry or not. We can then move on to why they are that way.
The basics of exposing a photo come down to three main variables: Shutter speed, Aperture and ISO.
It is the interplay of these three that create a well exposed image. Often when the light is low, you may be tempted (or forced by auto mode) to use slower shutter speeds, which can lead to blurry photos. If you need to brush up on some exposure basics, check out this excellent video on how these three variables work together.
Most issues relating to blurry photos arise when the light is low so, generally, in bright sunny conditions you won’t have too many problems.
So let’s hop straight into it.
1. Shutter Speed
1/50 sec at f/6.3, ISO 200, Focal length 56mm. The car is blurry due to slow shutter speed, the background is blurry due to camera movement during exposure
The number one reason your photos are blurry is that your shutter speed is too slow.
This introduces blur from either the camera moving during exposure or things moving within the image whilst the shutter is open.
The general rule of thumb to determine the minimum shutter speed to use is 1/Focal Length. For example, if I’m using a 50mm lens, then my minimum shutter speed should be 1/50th of a second. This is a minimum, anything faster than this would be even better. If I’m shooting a 200mm lens, then 1/200th. This is normally never a problem in bright daylight, but when the light drops you must maintain your shutter speed and compensate with either of your other 2 variables – aperture or ISO. Note that many cameras and lenses these days have some sort of image stabilisation. This can significantly reduce blurry photos, although it doesn’t help with freezing action in a shot.
1/50 sec at f/2.0, ISO 320, Focal length 55mm. The shutter speed is too slow for both the walking man and the moving train.
I recommend experimenting with shutter speeds to see what’s needed to freeze action. For example, you will need a higher shutter speed to freeze a car travelling at 100km/hr vs a person walking at 5 km/h. A person walking across the frame requires a higher shutter speed than someone walking directly towards you. Again not much of a problem in bright light but once the light drops, or you are inside, maintaining high enough SS’s is critical to avoid blurry photos.
0.5 sec at f/8.0, ISO 400, Focal length 17mm. People only slightly blurred at 0.5 seconds. Some even appear quite sharp
2.0 sec at f/8.0, ISO 160, Focal length 17mm. People much more blurry at 2 seconds exposure. Some still appear sharp as they didn’t move much during the exposure.
2. Your Lens
Lens choice will also have a big effect on the sharpness of your photos.
Firstly as mentioned in point # 1 above, the longer the focal length, the faster you need to set your shutter speed. Camera movements are accentuated at longer focal lengths, so a faster shutter speed helps to counter this. The longer the lens, the faster you will need.
Aperture will also affect sharpness. Depth of Field (DOF) is the range within an image that is perceived to be in focus. Many things affect this, but one, in particular, is the wider the aperture, the narrower will be your DOF. If you don’t focus where you want to or perhaps move the camera after focusing, you might take your point of focus outside of the effective DOF. It will then appear blurry. A good example of this is shooting a fast portrait lens, like an 85/1.8. At f 1.8 and one meter from your subject, you have about a 2cm strip that’s in focus. This is a very small margin, and only the slightest of swaying or moving the camera and you’ll be out.
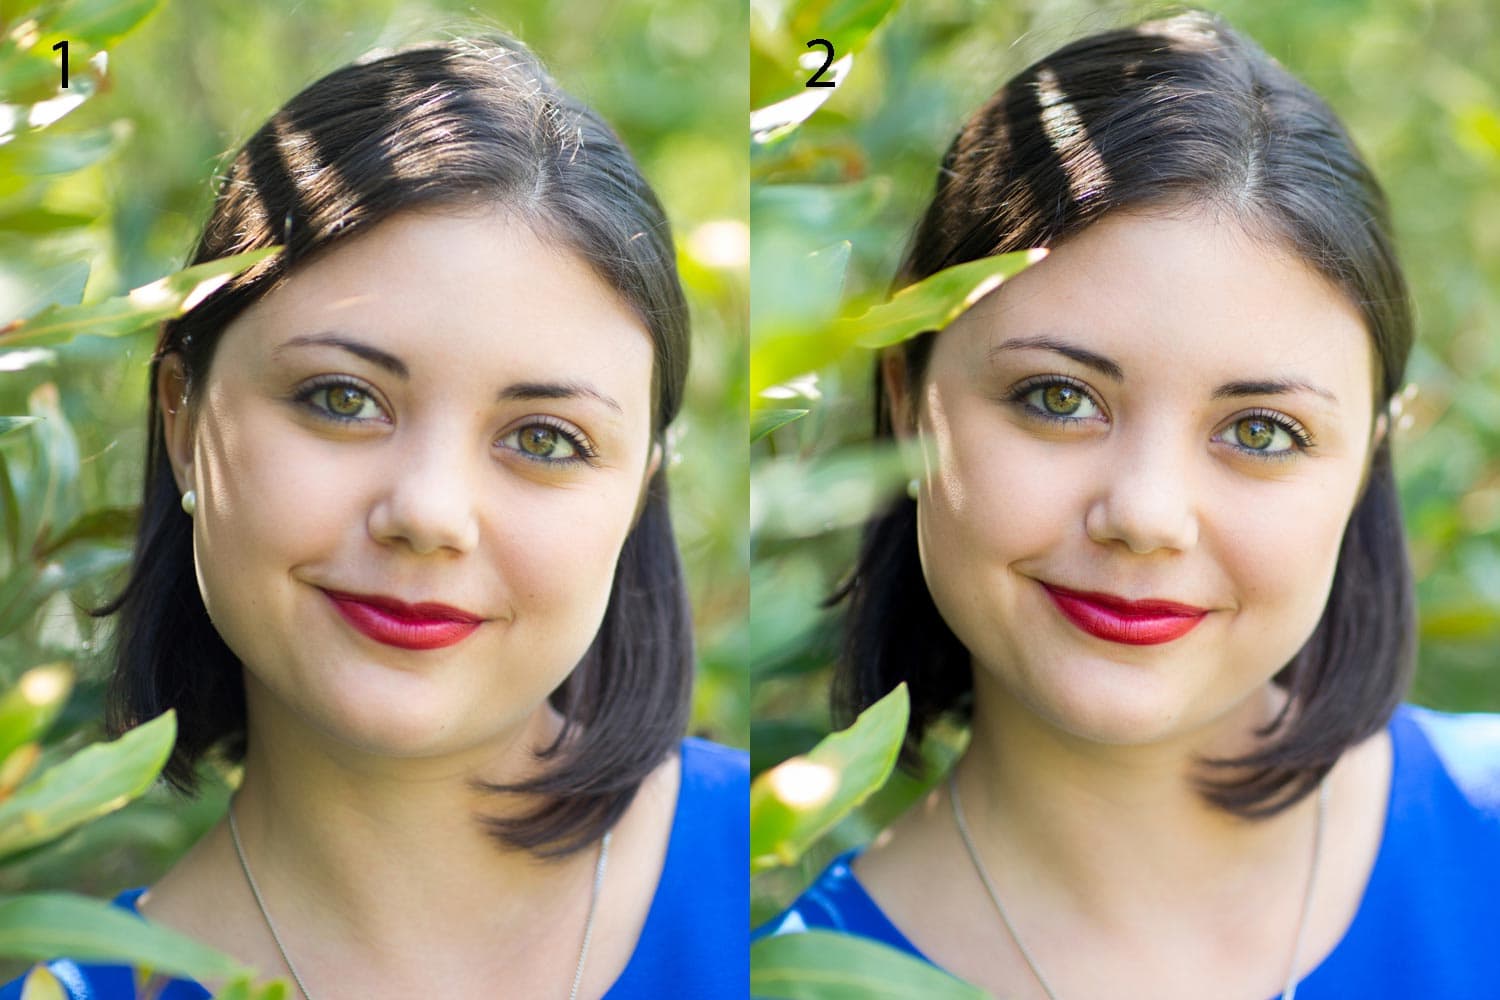
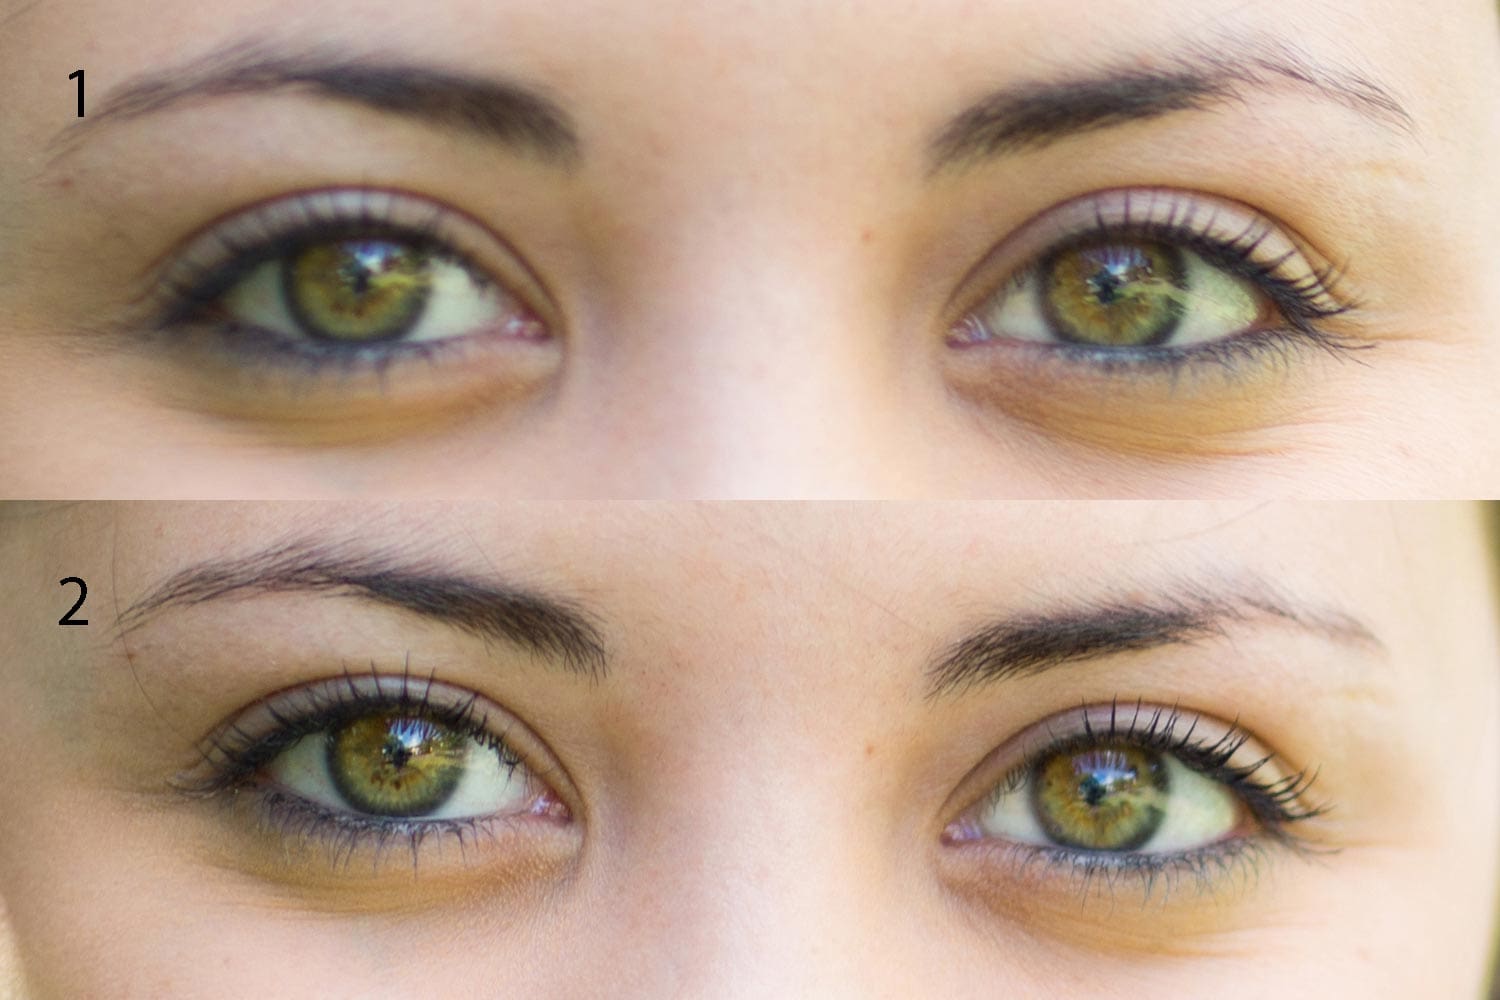
1/250 sec at f/2.20, ISO 1600, Focal length 85mm. At first glance both of these images appear to be in focus
1/250 sec at f/2.20, ISO 1600, Focal length 85mm. The same images magnified 100% show that #1 is blurry because of a missed focus due to a shallow DOF
Follow this link for a DOF calculator to check your own camera and lens combinations.
Note also that lenses also vary in quality. Cheaper, lesser quality lenses are often not as sharp as the higher end, professional ones. When wide open, lenses are often softer too, unless they are the very highest grade professional lenses. Stopping down your lens can really help to sharpen up photos.
On the other extreme at very low apertures, lenses start to exhibit what is called diffraction. Without going into too much detail, as light squeezes through a smaller hole it diffracts/bends, and this results in blurry photos. The point at which this happens varies from lens to lens, but it can start from as low as f9-11. Often though it’s more from f16 upwards. Diffraction isn’t nearly as bad as camera shake. It’s a more subtle blur, but blur nonetheless. Check out this video for a more detailed explanation.
3. Focusing your camera
1/50 sec at f/4.0, ISO 200, Focal length 70mm. Would have been a cool shot, shame I totally missed the focus
It seems obvious to mention this point, but having the subject of your image clearly defined, and then in focus, is technically what an “in focus” image actually is.
Modern cameras have amazing autofocus, but they don’t always get it right. Simply missing focus is an obvious way to get blurry photos.
It’s important your photos have a clear subject or point of focus so the viewer knows what to look at, and therefore what they expect to be in focus. A good example is the eyes in the portrait images shown above. You can shoot portraits with a very shallow DOF, but the eyes must be in focus. If they are, then it doesn’t matter if the nose, ears or whatever else are blurry. If you miss the focus and have someone’s ears sharp but their eyes blurry, this will just look and feel wrong. Another example is shooting an insect on a flower. At macro levels, DOF is ever narrower. If the subject of the image is the insect, but the flower petal behind it is sharp while the insect is blurry, this will also look wrong. Technically the image is sharp, it’s just on the wrong part of the image.
4 .The quality of the light
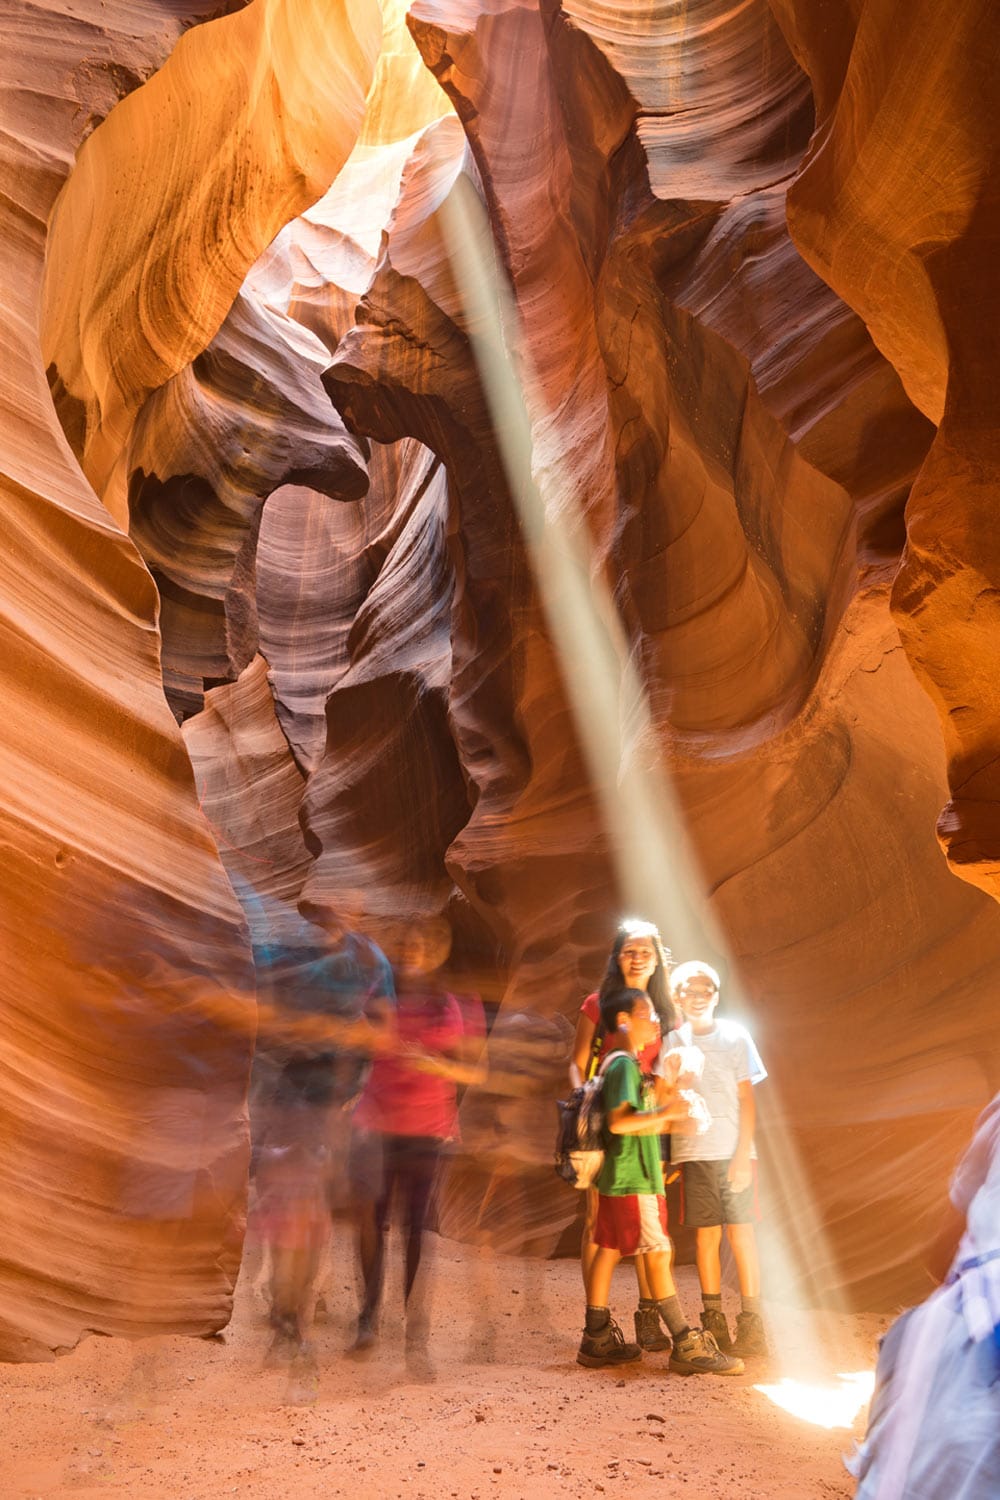
2.5sec at f/9.0, ISO 100, Focal length 34mm. The canyon walls are sharp but people very blurry at 2.5 sec shutter speed
Light quality will also affect the apparent sharpness and can lead to blurry photos.
Contrasty light will often result in photos that appear to be sharper. Edges are more clearly outlined and the perceived sharpness is increased. You can even make blurry photos look sharper by editing them in Photoshop and improving micro-contrast.
If you shoot at high ISO’s because of poor light, the noise introduced by the high ISO setting can also make photos appear softer. Photography is all about light, so it’s little surprise the quality of light impacts sharpness.
5. Camera stability
10 sec at f/8.0, ISO 320, Focal length 38mm. Camera on a tripod but the bridge I was on was moving due to traffic, which resulted in a blurry photo
This point relates to what we introduced in point #1 about minimum shutter speed based on 1/focal length. That rule of thumb is for handheld shots.
However, If I can lock my camera down on a tripod so it won’t move, then I can do exposures for as long as I want.
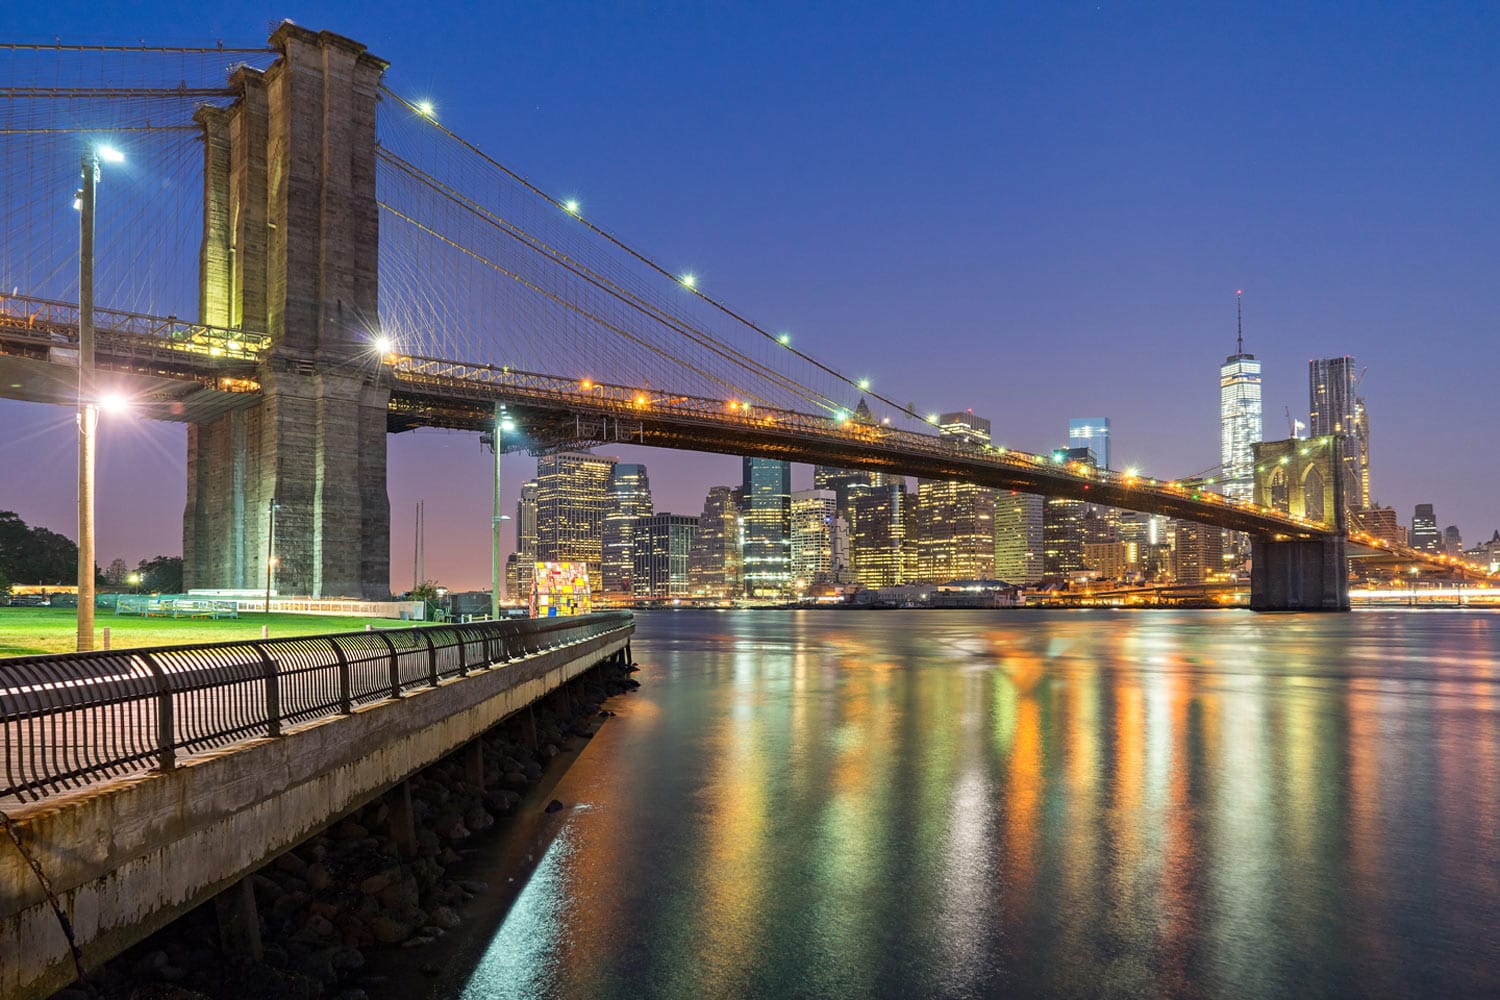
Dusk and dawn photography will often see images with 20-30 second exposures. Astrophotographers often take shots with exposures of many hours to create star trails in the sky. Note that in such long exposures, anything moving in the frame will blur, but static things will be sharp. A good example of this is car light trails. The road and buildings all look sharp, but the lights create wonderful light trails.
8 sec at f/8.0, ISO 160, Focal length 28mm. Here everything stationary is sharp, but the moving palm fronds are blurry and there is a light trail from a passing car.
An extra point on this is to minimise camera movement by firing it remotely or on a timer.
The physical action of pressing the shutter can induce camera shake. This is especially important for those long exposure shots.
DSLR cameras have a mirror that lifts up when you take a photo, to let light onto the sensor. The mirror raising up can induce minor vibrations to your camera, and result in blurry images. For this reason, most DSLRs have a function called mirror lockup. This means your camera takes a shot in two steps. Firstly the mirror is raised, then the photo is taken. I always engage mirror lockup when taking longer exposures on a tripod. You can map this feature to a quick menu on most cameras, so it’s easy to get to.
OK, that’s it. 5 reasons why your photos are blurry, and what you can do about it.
Like most photographers, I’m a stickler for sharp images. That being said, over the years I’ve softened my stance marginally and will sometimes find a slightly blurry shot is acceptable if it’s really awesome. That’s pretty rare though. Better to have an awesome image, and have it in focus.
If you enjoyed this post, please join our newsletter for more tutorials like this, delivered straight into your inbox. If you’d like to leave some comments, please do so below.
5 Comments
Shannon Everest
on April 13, 2016 at 6:47 pm
Awesome, practical and supportive tips and advice for improving photographic skills,
Thank you.
dean whitling
on April 23, 2016 at 4:37 pm
Thanks Shannon, I’m glad you found them helpful. Keep an eye out on the site for more coming soon.


Awesome, practical and supportive tips and advice for improving photographic skills,
Thank you.
Thanks Shannon, I’m glad you found them helpful. Keep an eye out on the site for more coming soon.
Thanks very nice blog!
Thanks for stopping by and checking it out.
Outstanding post..
Hope you seem to be doing a great job.
Your tips have been effective for me. Thank you.