Lightroom Workflow … this is part 2 of a blog I released around a week ago on how I use Lightroom for both my professional and private work
In that blog, Lightroom Workflow Part 1, I went into depth about what lightroom is, what it does and then some videos walking through the various modules that I use. This part 2 will cover my Lightroom workflow in-depth i.e. how I take a photo from the camera, right through to the final exporting of finished files. I won’t be going into detail about the mechanics of editing, rather this post is focused on the workflow of images from start to finish.
Having an efficient and consistent workflow is the name of the game here. Efficiency means you can process hundreds and often thousands of images quickly and effectively. Consistency means you don’t have to keep reinventing the wheel, plus you get no surprises in the final result. Once you have a workflow like this, you’ll be amazed at how well you can process large batches of images.
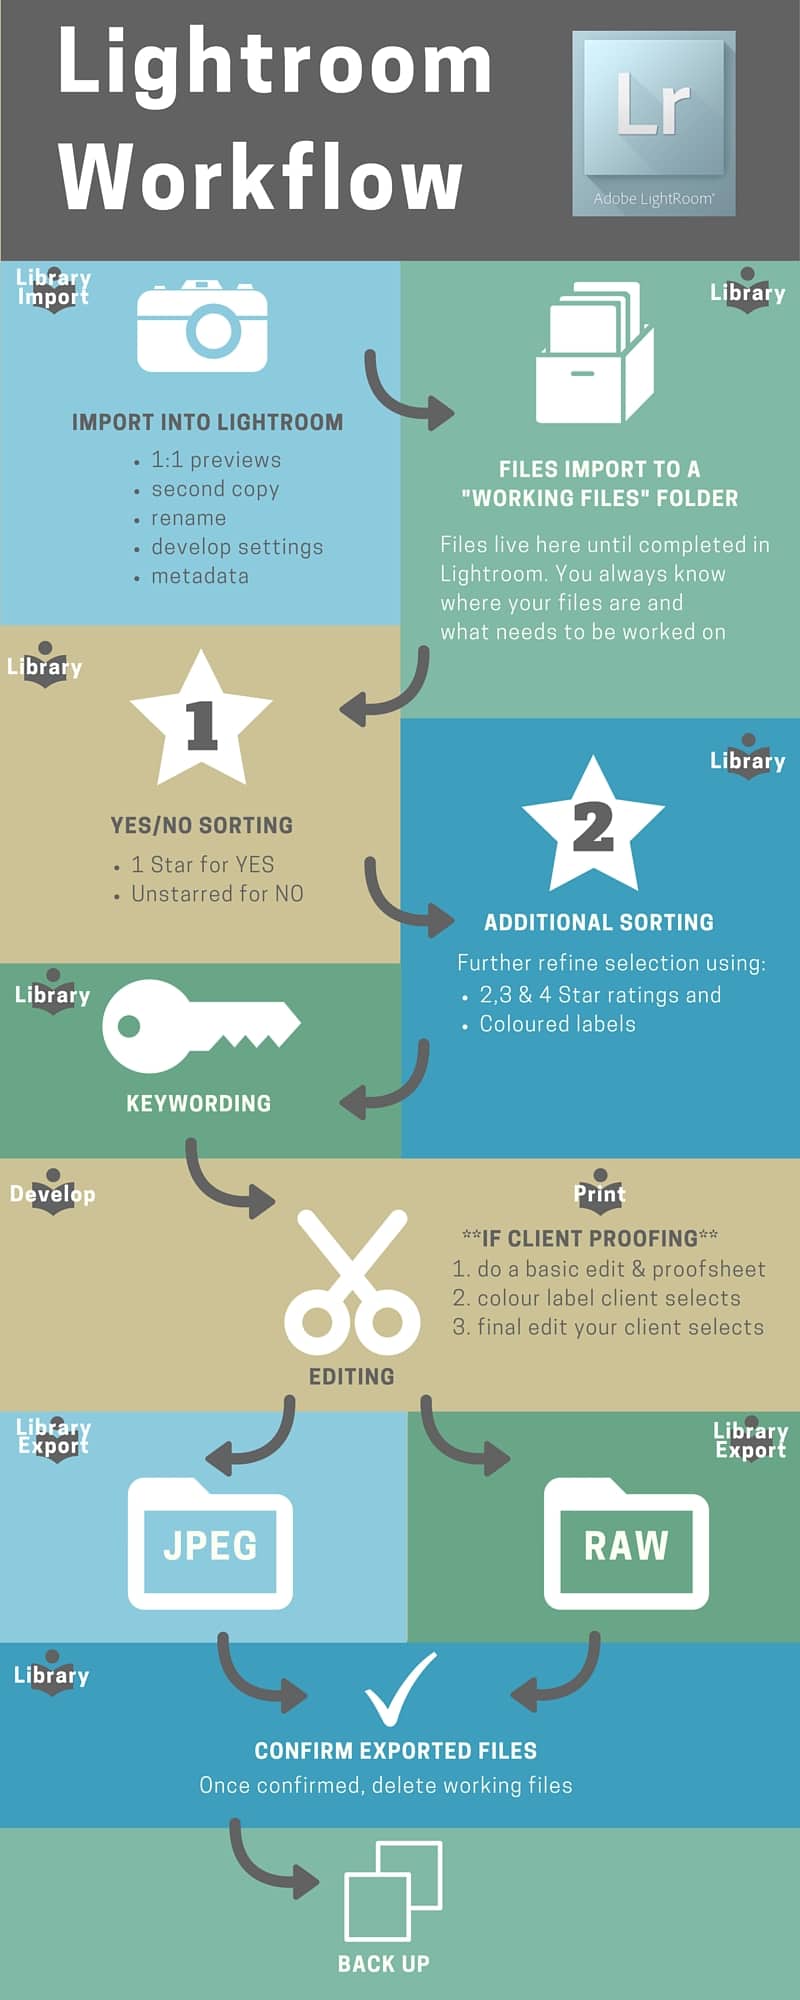
Ok, let’s dive straight in. The diagram on the right visually represents the lightroom workflow we are about to go through. Click on the image to see it larger.
There are roughly nine parts to the process which we will go through in detail, but here they are in brief:
- Importing/ Working Files folder
- Yes/No Sorting
- Additional Sorting
- Keywording
- Editing
- Proofing
- Exporting
- Confirming
- Backing Up
Lightroom Workflow – 3 easy steps
1. Importing to the Working Files folder
I have a master folder called “working files” on my main hard drive. This folder is very important. It’s where I download every shoot I do. All my Work-In-Progress (WIP) images live here and it’s the only place they live. It’s a temporary holding area for images whilst they are being worked on in Lightroom. They will live in this folder until I have completed all the Lightroom work I need to do. This way I always know what I have in progress and can quickly see what needs to be done. I create separate folders for each shoot inside this master “working files” folder.
I use the import function in the Library module of Lightroom to import photos into a folder inside my ‘working files’ folder, and have Lightroom automatically do the following:
Build 1:1 previews, make a second copy, rename files, apply develop settings and apply metadata.
The brilliant thing about Lightroom which helps efficiency is the amount of automation we can set up to do repetitive tasks. See the video below for how to do this.
2. Yes/No Sorting
Once Lightroom has created 1:1 previews (which can take a while), I start sorting through my images in the Library module. The purpose of this is to do an initial sort of the photos as quickly as possible. This is a first level, yes or no decision. i.e. to keep or discard. Any obvious out of focus images, eyes closed, accidents etc can be eliminated here.
The way I do my sorting is to use the Lightroom Star ratings. These are great for helping you to sort and organise your photos.
0 star = discard image
1 star = keep image
2 star = best of the shoot
3 star = outstanding shot
4 star = best of the best
5 star = I haven’t used this yet, keeping it available for something even better than the best.
So the Yes/No sorting is a very simple job of applying 1 for a YES and 0 for a NO. The 1 star is applied by simply hitting the number one on your keyboard. All photos are all zero to start with, so this doesn’t need to be applied.
Importantly this initial sweep is to be done quickly, without thinking too much. Trust your ability to make a good decision, and if you are uncertain, give it a 1 star to come back to later. Remember, if it doesn’t get a 1 star, you are basically discarding the image forever.
Something I do a lot of here is zooming into the image to check sharpness. I will also use the compare image feature (N on the keyboard) to put images next to one another for comparison
3. Additional Sorting …..and filtering
Filtering is a powerful feature of Lightroom that enables us to only make certain images visible, depending on the criteria we choose. Once I have done my initial Yes/No sorting, I then filter the Library to only show me 1 Star images i.e. my Yes selects. The Nos are still there, I just don’t want to see them anymore.
